Troubleshooting Guide for the Coin Acceptor
How to calibrate coin acceptor make sure tubes are empty
https://www.youtube.com/watch?v=eY9rSme44HQ
Coin Acceptor Troubleshooting
https://www.youtube.com/shorts/ij2h6b12uPc
How to check coin acceptor for any coins stuck (taiwan brand is in Chinese) follow the video guide
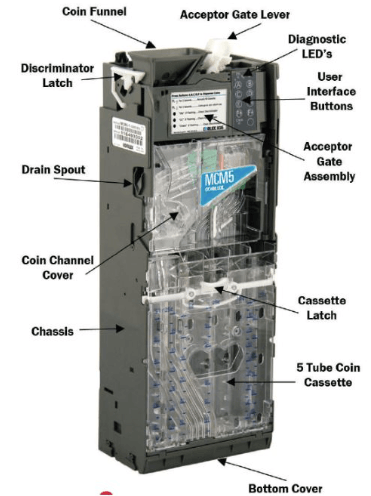
MEI CPI Coin Acceptor
For a CPI / MEI coin acceptor, the initial testing process is called:
Coin Acceptor Calibration and Validation
This ensures the machine:
Accepts valid coins correctly
Rejects invalid coins correctly
Reads coin values accurately
Sends the correct credit to the vending machine controller
There are actually TWO important initial procedures:
1. Coin Calibration (Coin Teach / Coin Learning)
This is the process where the acceptor learns and recognizes coin types.
You insert sample coins such as:
₱1
₱5
₱10
₱20
The acceptor measures:
Size
Weight
Metal composition
Electromagnetic signature
This creates a reference profile.
This is called:
Coin Calibration
Coin Teach Mode
Coin Programming
(All refer to the same concept depending on model)
2. Coin Acceptance Testing (Functional Test)
This is what you described — testing if:
Coin is accepted
Credit is added correctly
Coin routes properly
Change function works (if enabled)
This is called:
Coin Acceptance Test
Coin Validation Test
Functional Test
When the screen shows: "OK 0.00 PHP"
This means:
Coin acceptor is powered correctly
Communication is working
No errors detected
System is ready for calibration or use
This is a good sign.
CALIBRATION MUST BE DONE WITH EMPTY COINS
STEP 1
Empty all the coins in the coin acceptor
STEP 2
Calibrate the coin acceptor, follow this video guide, https://www.youtube.com/watch?v=yD49WKMXdhE
STEP 3
Once its successful, you can now start putting coins from the top.
Recommended Initial Setup Procedure (standard process)
Step 1 — Power on machine
Step 2 — Check display shows OK
Step 3 — Insert each coin denomination 5–10 times
Step 4 — Verify correct credit appears
Step 5 — Check coin routing to correct tube or cashbox
Step 6 — Verify reject function works
Step 7 — Test change dispensing (if applicable)
Correct preparation before calibration
Do this checklist:
✅ Empty all coin tubes
✅ Remove coins from escrow / sorter
✅ Make sure no coins are stuck
✅ Start calibration mode
✅ Insert coins one by one slowly
After calibration
You can refill the tubes normally.
Additional Professional Term: Float Setup
This is when you preload coins so machine can give change.
Example:
₱10 coins × 20 pcs
₱5 coins × 20 pcs
This is called:
Float Loading
FLOAT LOADING
Correct Method (Recommended): Load coins DIRECTLY into the coin tubes (inside)
This is the proper and professional way.
You open the machine and load coins directly into the coin tubes of the coin acceptor / coin changer.
Why this is correct:
Faster
More accurate
No unnecessary wear on validator
Prevents misreads during setup
Standard procedure used by operators
Incorrect / Not Recommended for initial float: inserting coins from outside repeatedly
This method works, but it is:
Slow
Unnecessary wear on acceptor
Can misroute coins
Not professional setup method
This method is only used during normal customer operation.
Correct Professional Float Loading Procedure (Step-by-Step)
Step 1 — Open vending machine door
Locate the coin changer unit (CPI / MEI unit)
You will see tubes like:
Tube A — ₱20
Tube B — ₱10
Tube C — ₱5
Tube D — ₱1
(depending on configuration)
Step 2 — Insert coins directly into tubes from the top
Each tube has an opening.
Insert coins manually.
Example recommended starting float:
₱20 × 20 pcs = ₱400
₱10 × 30 pcs = ₱300
₱5 × 40 pcs = ₱200
₱1 × 50 pcs = ₱50
Total float example = ₱950
You can adjust depending on pricing.
Step 3 — Check tube level on display
Your CPI unit screen may show:
Tube status
Float value
Coin level
Or check via vending machine service menu.
Step 4 — Close machine and test change
Insert bill or coin and buy cheaper item.
Confirm machine gives correct change.
Important: Do NOT mix coins in wrong tubes
Each tube is programmed for specific denomination.
Wrong placement = change errors.
When should you insert coins from outside?
Only for:
Testing coin acceptance
Normal customer usage
Calibration testing
Not for bulk float setup.
Professional operator standard practice worldwide:
Always float load directly into tubes manually.
Never load float by inserting coins repeatedly through front acceptor.
NO PROMO THIS MONTH
QUICKLINKS
First time owner guide
Must know before buying Android

Buy this ebook before purchasing a vending machine. Money back after you purchase a unit.
We are a vending solution provider that can handle all of your needs. Vending machines, system servicing, logistics, product procurement, and location search are all part of our comprehensive approach.
+63 976 093 3901
Vending Machine Ph by Itadish 2025